Cookie Consent


Wednesday, October 12, 2011

Ribbon storage........

I have been trying to find an inexpensive way to keep my ribbons stored.  I wanted the system to be well organized and the ribbon easy to access.  Well I stumbled across this today on Pinterest http://pinterest.com/pin/303947098/  .  It's a website that you can join and post your favorite things.

I love this!!

Dollar store here I come!!


Monday, October 10, 2011

What would you do with a toilet paper tube?

I will be showing you what I did ..........soon...............but not today.  I want you to think about what you think I might have made and post it in the comment section of this page.  I am looking forward to seeing your answers.


It's Monday!  The beginning of another week of warm October weather in Southern Minnesota.  This IS unusual but I bet we aren't going to complain cause we know what comes next - cold, ice and dreams of spring.

IN THIS ISSUE:

  • Check out this weeks contest
  • Links - to see what can be done with the ART PHILOSOPHY cricut cartridge

Friday, October 7, 2011

It's Friday!

I am looking forward to the weekend.  Love the kids but love the breaks too!

I have posted a mini-album on the Etsy Shop page.  I will be putting it in my Etsy Shop "Celebrate Memories" at some point this weekend.  Take a peek, maybe it will spark some ideas of your own or provide a product that will hold those special photos you have stored away.

The video I have posted will introduce you to the Close To My Heart exclusive Cricut cartridge "Art Philosophy".  It also shows the other products that are included with the cartridge package.

As promised, here are the directions for the birthday card I made for my son.


The card is made on a 5.5 by 4.25 base of desert sand cardstock.  The face of the card is made with a 5.5x4.25 piece of Elemental B&T duo paper.  Layered on top of the duo paper is a piece of desert sand cardstock that was torn along the bottom edge and distressed with chocolate and barn red ink. It was then adhered to the duo paper with dot runner tape. On the top portion was added a crumpled piece of duo paper that was inked with barn red ink and adhered to the duo paper.  A fall covered ribbon was attached with the ends turned under the duo paper and adhered to the back.  This completed piece was then sewn around the edges and attached to the card base.   The sentiment tag was cut using the Art Philosophy cricut cartridge and the edges were inked with chocolate ink.  The sentiment was also stamped with chocolate ink and heat embossed with clear embossing powder.  A brad was attached to the upper left corner.  Before attaching the tag the leaves were stamped with the stamp set "Seasons Change" using chocolate and cranberry inks. They were cut out and then restamped with versamark and heat embossed with clear embossing powder.  The leaves were attached to the card using mounting foam.  Then the sentiment tag was attached with mounting foam.  I don't have a picture of the interior of the card but it contains many of the same components as the front of the card with the sentiment "Happy Birthday".

Thursday, October 6, 2011

As Promised.......

Hello Friends
On yesterday's post I promised to let you in on how I created my children's birthday cards so here goes.
I am going to start with my daughter's card and tomorrow I will finish up with the card I made for my son.


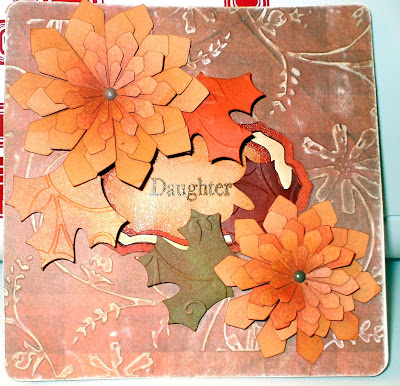
Fall Birthday Cards
Materials, tools and equipment:

  • Antique white cardstock for the card base; olive green, tan and orange for the leaves.
  • B&T duo paper ( the paper I used is a discontinued item from Close to my Heart.  It is a plaid paper in browns and oranges)
  • cuttlebug and cuttlebug embossing folder - "Stylized Flowers" and "Birds and Swirls"
  • sandpaper - fine
  • Close To My Heart inks:  chocolate, cranberry, goldrush, barn red
  • Stamp sets: Dream, Little Princess, Family
  • clear embossing powder and heating tool
  • CTMH chocolate brads
  • piercing tool and base to use for piercing
  • daubers or sponges
  • adhesive
  • Versamark
  • Cricut
  • Art Philosophy Cartridge - this cartridge is an exclusive item of Close To My Heart that was designed in conjunction with Provo Craft and distributed only through CTMH.
Constructing the card:
  1. I cut the base of the card using the Cricut and the Art Philosophy cartridge.  This cartridge has many card designs and cuts the opening on the front of the card!  It is amazing!!!.
  2. I then worked on the front of the card.  I cut the B&T duo paper using the Art Philosophy cartridge to the 5.5x5.5 measurement and embossed it with the cuttlebug folder "stylized flowers". (I cut the paper using the same Cricut Art Philosophy card template and then cut off the back portion of the card leaving the front portion to layer on the base of the  card.)
  3. Using the sandpaper I gently rubbed over the raised embossing to remove the color.
  4. I adhered the piece to the base of the card.
  5. Using the Art Philosophy cartridge again I cut two frames for the opening on the face of the card. The second frame is adhered to the opening on the interior of the card. (See interior photo below.)
  6. I daubed the frame with cranberry ink and heat embossed it with clear embossing power.  I inked the edges with the chocolate ink and adhered to the card.
  7. Making the flowers and leaves:  AGAIN using the Art Philosophy cartridge I cut the flower shapes in graduated sizes using a light orange BT duo paper.  For the large flower I started at 2.5 inches and decreased each additional set of petals by .25 inches.  I cut five sets of petals.  The smaller flower began at 2 inches and again has five sets of petals.
  8. I then pierced the center of each set of petals and assembled the petals with a chocolate brad.
  9. Using a piece of sponge for each color of ink I layered the ink starting with goldrush, then chocolate and then cranberry.  
  10. The leaves were cut using the Art Philosophy cartridge and then  embossed  using the Birds and Swirls embossing folder .
  11. I inked the leaves using cranberry and brown ink.
  12. I adhered the leaves and flowers using adhesive dots


Interior of the card.

  1. I stamped the left side of the interior with a flourish from the Close To My Heart "Dreamin'" set.
  2. I then distressed inked both sides with barn red.
  3. On the right side, again using the Art Philosophy cartridge, I cut the large frame and two tags, the larger using orange cardstock and the smaller using the antique cardstock.  There is a .25 inch difference in the two tags.
  4. I stamped the sentiments: "You Are Always In My Heart" "Daughter" and "Happy Birthday" from the Close To My Heart stamp sets listed with the chocolate ink.
  5. I embossed the large frame with the "Birds and Swirls" embossing folder  and then distressed inked it with barn red ink.
  6. The tag was stamped with "Daughter"; adhered to the larger tag; distressed inked with barn red ink; then I pressed the face of the tag into the VersaMark pad and then, using clear embossing powder, heat embossed the tag which gives it the shine.
  7. The leaf was made in the same manner as the leaves on the front of the card.
  8. I then adhered the pieces using runner dot tape.

That seems like a lot of words ......  But hopefully you can follow it~  
If you have any questions give me a shout and I will do my best to answer them.


Sooooooooooooo, until tomorrow have a great day!

TAKE CARE OF YOU!

kb


Wednesday, October 5, 2011

Season's Change......................

but many things never change like the love for our children, parents, friends, siblings, family.  Today I want to share with you the birthday cards I made for daughter, Elaine, and my son, Matt.  They both have October birthdays separated by only a day, Oct 7th and Oct 9th.  They are the heart of my life!

It has been a long while since I have worked on keeping my blog up to date but with renewed commitment to sharing my passion for making cards and much more.... I am going to be here everyday (or close it) to let you know what I am up to, show you my current projects and walk you through how I brought them to be.

I hope you will check out what "pushes my creative buttons" often and, even more importantly, I hope that what I show you will inspire you to discover your inner artist.

Please leave me a note when you visit to let me know what you think and what you are up to as well.

Happy scrappin'

Karen

Friday, June 17, 2011

HELPING YOU TELL YOUR STORY IS MY PASSION!


I am passionate about helping people tell their stories so they can pass them down to the next generations. 

Where did this passion begin.  About a year ago when I decided to put together the story of my grandson and myself..  Why?  Because long after this old granny is gone I want Thomas to have something concrete to bring back the memories of the events we shared.  From this initial desire has come other ideas for expanding the telling of my story to include my childhood memories and my family tree.  AND all of this comes from knowing how I feel when I see an old photo of one of my ancestors and how I would love to know more about their story.

So, in my story telling journey, it has brought me here.  A need to share what I have already learned and what I will learn about preserving photos that represent the occasions of our lives and our memories. 

There are a variety of “story telling” formats, using photographs, to choose from.  Following are some of them:

*  through pictures that are carefully preserved in an organized system that has been lovingly cataloged and labeled so others will be able to appreciate the pictures and the history that they represent;

*  through photo albums that are again carefully arranged, labeled, and perhaps include snipets of journaling that convey the owners feelings, sense of history and importance of passing on the story;

*   scrapbooks that add some more detail to the pictures and journaling and showcase each selected moment in a unique way,

*    through digital scrapbooking that incorporates all of the traditional scrapbooking elements with the digital age and creates great pages and doesn't involve any cutting, gluing, or buying & storing a lot of supplies.

     These are all great options to organize and record your own unique, wonderful, amazing story for your children, grandchildren, great-grandchildren and the generations to come.

Each week, I will share information on how to make your efforts at putting together your story “faster, simplier, easier” (tm-ctmh).       

Upcoming topics will include:
  • Working with each format – breaking it down
  • Choosing the format to tell your story – What makes sense to me?
  • Getting Organized –Where Do I Begin?
  • What Do I Need To Get Started – What supplies do I need?
  • The Next Step – Keep It Going
  • Information on where you can find Tutorials and Examples – learning through seeing and doing.
  • Any topics that are submitted through my blog that will have general appeal

Additional information and pictures on each topic will be posted here on my blog:

Please let me know what you want to know more about to help you preserve and tell your story!

Tell Your Story!
Celebrate your Memories!
Sunday, June 12, 2011

Some notes about the following video


YOU DO NOT HAVE TO  MAKE A QUALIFYING PURCHASE TO GET THIS KIT DURING JUNE FOR $15.  ORDER BEFORE JUNE 25TH AND I WILL PAY THE TAXES AND SHIPPING!!!  HURRY, THIS OFFER IS ONLY GOOD AS LONG AS THERE ARE KITS AVAILABLE!

I'm Still Here!!! (just in case you're wondering ;-) )

Just wanted to check in since it's been a while.

What's new at CTMH you ask? Well, in order to help the tornado victims the "You and Me" scrapbook kit that normally is listed at $30 can now be yours for $15 AND a protion of the proceeds goes to the Red Cross. This is a great value. See the pages I made with this kit to the right.

I am running my own June special. If you make a purchase through me, NOT myctmh site, before June 25th I will pay the taxes and shipping!!! HURRY, HURRY, HURRY on this special cause it won't happen again this year!!!

I have been busy making cards and scrapbook pages for my Etsy shop, Celebrate Memories. I hope you stop by and browse.

Happy Scrapping!
Karen.