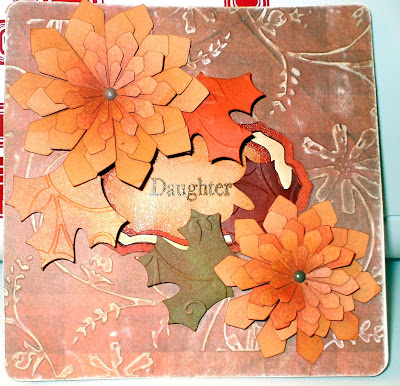
On yesterday's post I promised to let you in on how I created my children's birthday cards so here goes.
I am going to start with my daughter's card and tomorrow I will finish up with the card I made for my son.
 |
| Materials, tools and equipment: |
- Antique white cardstock for the card base; olive green, tan and orange for the leaves.
- B&T duo paper ( the paper I used is a discontinued item from Close to my Heart. It is a plaid paper in browns and oranges)
- cuttlebug and cuttlebug embossing folder - "Stylized Flowers" and "Birds and Swirls"
- sandpaper - fine
- Close To My Heart inks: chocolate, cranberry, goldrush, barn red
- Stamp sets: Dream, Little Princess, Family
- clear embossing powder and heating tool
- CTMH chocolate brads
- piercing tool and base to use for piercing
- daubers or sponges
- adhesive
- Versamark
- Cricut
- Art Philosophy Cartridge - this cartridge is an exclusive item of Close To My Heart that was designed in conjunction with Provo Craft and distributed only through CTMH.
Constructing the card:
- I cut the base of the card using the Cricut and the Art Philosophy cartridge. This cartridge has many card designs and cuts the opening on the front of the card! It is amazing!!!.
- I then worked on the front of the card. I cut the B&T duo paper using the Art Philosophy cartridge to the 5.5x5.5 measurement and embossed it with the cuttlebug folder "stylized flowers". (I cut the paper using the same Cricut Art Philosophy card template and then cut off the back portion of the card leaving the front portion to layer on the base of the card.)
- Using the sandpaper I gently rubbed over the raised embossing to remove the color.
- I adhered the piece to the base of the card.
- Using the Art Philosophy cartridge again I cut two frames for the opening on the face of the card. The second frame is adhered to the opening on the interior of the card. (See interior photo below.)
- I daubed the frame with cranberry ink and heat embossed it with clear embossing power. I inked the edges with the chocolate ink and adhered to the card.
- Making the flowers and leaves: AGAIN using the Art Philosophy cartridge I cut the flower shapes in graduated sizes using a light orange BT duo paper. For the large flower I started at 2.5 inches and decreased each additional set of petals by .25 inches. I cut five sets of petals. The smaller flower began at 2 inches and again has five sets of petals.
- I then pierced the center of each set of petals and assembled the petals with a chocolate brad.
- Using a piece of sponge for each color of ink I layered the ink starting with goldrush, then chocolate and then cranberry.
- The leaves were cut using the Art Philosophy cartridge and then embossed using the Birds and Swirls embossing folder .
- I inked the leaves using cranberry and brown ink.
- I adhered the leaves and flowers using adhesive dots
 |
| Interior of the card. |
- I stamped the left side of the interior with a flourish from the Close To My Heart "Dreamin'" set.
- I then distressed inked both sides with barn red.
- On the right side, again using the Art Philosophy cartridge, I cut the large frame and two tags, the larger using orange cardstock and the smaller using the antique cardstock. There is a .25 inch difference in the two tags.
- I stamped the sentiments: "You Are Always In My Heart" "Daughter" and "Happy Birthday" from the Close To My Heart stamp sets listed with the chocolate ink.
- I embossed the large frame with the "Birds and Swirls" embossing folder and then distressed inked it with barn red ink.
- The tag was stamped with "Daughter"; adhered to the larger tag; distressed inked with barn red ink; then I pressed the face of the tag into the VersaMark pad and then, using clear embossing powder, heat embossed the tag which gives it the shine.
- The leaf was made in the same manner as the leaves on the front of the card.
- I then adhered the pieces using runner dot tape.
That seems like a lot of words ...... But hopefully you can follow it~
If you have any questions give me a shout and I will do my best to answer them.
Sooooooooooooo, until tomorrow have a great day!
TAKE CARE OF YOU!
kb